 Ask The Home Geek
Whether you're lighting a whole room, going around corners, or extending a strip that came up short, you'll often need to join several LED strips together. It's easy to do, but how you connect and power them makes a big difference to how evenly they light up and how safely they run.
Here's how to join LED strips with connectors or solder, how to wire several strips to one power supply, and how to avoid dim ends and overloaded power supplies.
How Do You Connect Multiple LED Strip Lights?
There are two ways to physically join LED strips: solderless connectors, which are quick and need no tools, or soldering, which is the most reliable and permanent. Whichever you choose, match the strips' voltage and type, line up + with + and each color channel with the same channel, and make sure your power supply can handle the combined wattage.
Using Connectors (No Soldering)
Solderless connectors clip onto the copper pads at the ends of the strips. They're the easiest option for most home projects. Common types include:
- Strip-to-strip (gapless) connectors: These join two strips end to end with no gap, so the light stays continuous.
- Clamp-style ("hippo buckle") connectors: These have a hinged cover that snaps down firmly over the pads. They're quick to fit and grip well.
- Strip-to-wire connectors: These have a short length of wire between two clips. Use them to bridge gaps such as doorways or corners, or to connect a strip to a power lead.
- L-shaped and T-shaped connectors: These make neat corners and branches.
- Y-splitters: One input splits into two or more outputs, so you can run several strips from one controller.
How to use them:
- Unplug the power.
- Cut the strips at a marked cut point if you need to.
- Peel back a little of the adhesive backing at the end if the connector needs it. On waterproof strips, trim the silicone off the copper pads. If you're moving strips you've already installed, see our guide on how to remove and reuse LED strips.
- Slide the strip into the connector so the copper pads sit right under the metal contacts, with + matching +.
- Snap the connector shut firmly, then test before you stick the strip down.
Make sure the connector matches your strip. Check the width (8 mm and 10 mm are the most common), the number of pins (2 for single color, 3 for many tunable-white or addressable strips, 4 for RGB, 5 for RGBW, 6 for RGBCCT), and whether it's rated for waterproof strips if you need that.
Using Solder
Soldering takes more skill, but it gives you the strongest and most reliable connection. It's the best choice for permanent installations, long runs, or places where the strip will be moved or flexed.
You'll need: a soldering iron (a temperature-controlled one is ideal), thin rosin-core electronics solder, wire of the right thickness, wire strippers, and heat-shrink tubing.
- Unplug everything.
- Tin the pads and wires. Melt a small amount of solder onto each copper pad on the strip and onto the stripped end of each wire. This makes the final joint quicker and stronger.
- Join them. Hold the tinned wire against the matching tinned pad and touch the iron to it for a second or two until the solder flows together. Don't hold the iron on longer than you need to. Too much heat can lift the pads off the strip.
- Check your work. Make sure no solder is bridging two neighboring pads, and that every wire goes to the matching pad (+ to +, R to R, and so on).
- Insulate. Cover the joint with heat-shrink tubing or a clear end cap.
Stay safe while soldering. Work in a ventilated area, put the hot iron back in its stand every time you set it down, and keep the iron and fresh joints away from skin and cables.
Can You Connect Multiple LED Strips Together?
Yes, as long as the strips are compatible:
- Same voltage. Never join a 12V strip to a 24V strip.
- Same type. Join single-color to single-color, RGB to RGB, RGBW to RGBW, and addressable to addressable. For addressable strips, the chip type and data protocol need to match too.
- Ideally the same brand and model. Strips from different batches or brands can have slightly different colors and brightness.
Smart strips from brands like Govee or Philips Hue often only support the brand's own extensions, up to a maximum length. Check the manual before you add generic strips to them.
Daisy-Chaining vs. Parallel Wiring
You'll often see the words "series" and "parallel" used for LED strips. To be precise: 12V and 24V LED strips are always wired in parallel inside the strip itself, and you should never wire separate strips in true electrical series. That would split the voltage between them, and none of them would light properly.
What really matters is how you get power to each strip. There are two ways to do it.
Daisy-chaining (end to end)
You connect strip 2 to the end of strip 1, strip 3 to the end of strip 2, and so on, with all the power coming in at one end.
- Pros: It's simple and neat, with only one power lead.
- Cons: All the current has to flow along the strip's thin copper traces. The farther it travels, the more voltage is lost, so the far end gets dimmer, and with RGB or white strips, the color can shift toward red or yellow. The first section of the strip also carries the current for everything after it, which can make it run hot.
As a rough guide, keep a single daisy-chained run to about 5 meters (16 feet) for 12V strips and about 10 meters (33 feet) for 24V strips. Check your strip's spec sheet, because high-density strips may need shorter runs.
Parallel wiring
Each strip, or each section of a long run, gets its own pair of wires straight from the power supply, using a distribution block, terminal block, or splitter.
- Pros: Every strip gets full voltage, so brightness and color stay even, and no single strip carries too much current. If one strip fails, the others keep working.
- Cons: It means running more wire, plus a terminal block or splitter.
A common variation is power injection. You keep a long continuous run but add extra power wires at the far end, or every few meters, so the voltage stays even all the way along.
For anything beyond a short run, parallel wiring or power injection is the better choice.
Is It Safe to Connect Multiple LED Strip Lights?
Yes. Low-voltage LED strips are safe to join as long as the power side is done properly. The strips themselves only run warm, but an overloaded power supply, undersized wire, or loose connection can overheat. Follow these rules:
- Add up the wattage. Multiply each strip's watts per meter by its length, then add the totals together. For example, 10 meters of 14.4 W/m strip comes to 144 W.
- Leave headroom on the power supply. Load a power supply to no more than about 80% of its rating. A 100 W supply should run about 80 W of LED strip at most, so it runs cooler and lasts longer. Overloading the supply is one way LED strip lights can cause a fire. For the 144 W example above, you'd need a supply of at least 180 W.
- Check the controller too. RGB and smart controllers have their own maximum current or wattage rating. On large setups, you may need a signal amplifier or several controllers.
- Use a good-quality power supply. Choose one from a reputable brand with safety certifications (such as UL, CE, or UKCA, depending on your country) and built-in protection against overload, short circuits, overvoltage, and overheating.
- Use wire that's thick enough. Thin wire causes voltage drop and can get warm. As a rough guide, 18 AWG works for short runs at low power, and 16 or 14 AWG is better for longer runs or higher current between the power supply and the strips.
How to Connect Multiple LED Strips to One Power Supply
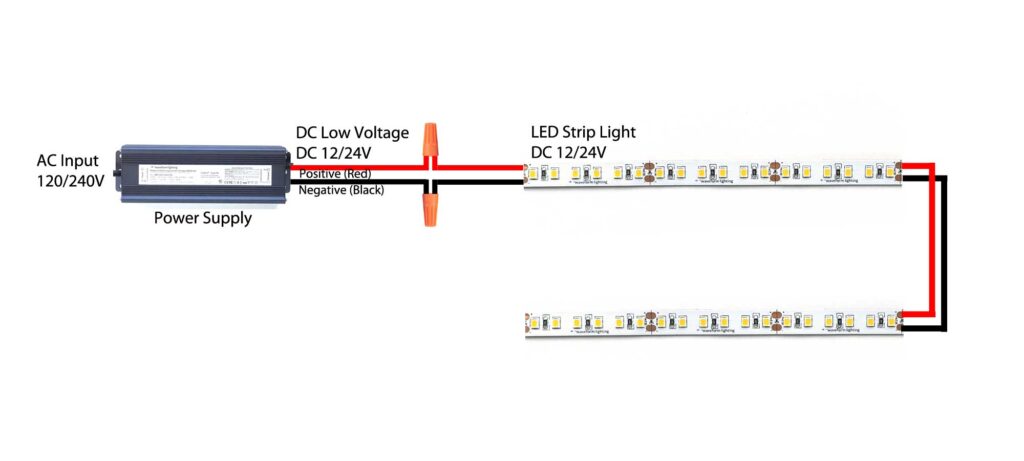
- Plan the layout. Measure each run and work out the total wattage, then choose a power supply with at least 20% headroom.
- Choose how to wire it. For short total lengths, daisy-chaining is fine. For longer setups or several separate strips, run each one in parallel back to the power supply.
- Set up the distribution. Connect the power supply's output to a terminal block or distribution block, or use a splitter cable for plug-in systems.
- Run a wire pair to each strip. Connect + to + and − to − from the distribution point to the start of each strip. For RGB or RGBW setups, run each strip from the controller's outputs, or use an amplifier for large installations, keeping every color channel matched.
- Inject power on long runs. If any single run goes past the length limits above, add a second feed at the far end or partway along.
- Test before mounting. Turn the power on and check that every strip lights up evenly with the right colors. Then let it run for a while and check that the power supply, connectors, and the start of each strip are only warm, not hot.
- Tidy and secure everything. Fix the wires in place, cover any exposed joints, and keep the power supply somewhere with airflow, never buried under insulation or in a sealed cavity.